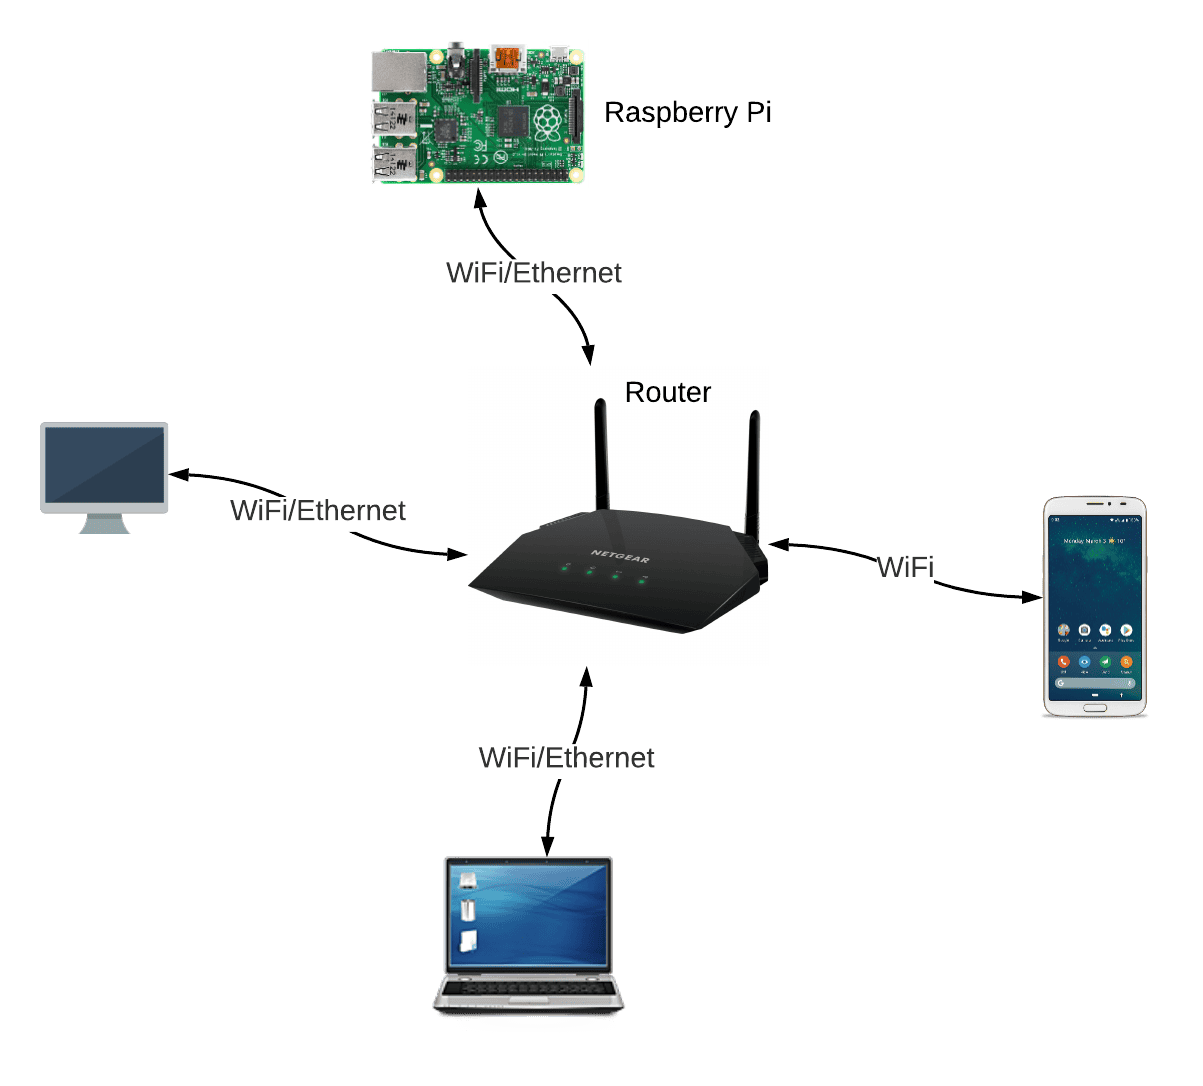
Setting up a Raspberry Pi VPC network example can open up a world of possibilities for tech enthusiasts and professionals alike. Whether you're a beginner or an experienced user, understanding the intricacies of configuring a virtual private cloud (VPC) environment on your Raspberry Pi can significantly enhance your networking skills. This guide will walk you through the essential steps to create a secure and efficient VPC setup using a Raspberry Pi, providing you with hands-on knowledge that applies to both personal and professional projects. As we delve deeper, you'll discover how to optimize your network for performance, security, and scalability, ensuring that your setup meets the demands of modern digital environments.
Raspberry Pi has become an indispensable tool for hobbyists, developers, and educators due to its versatility and affordability. By leveraging its capabilities to create a VPC network example, users can explore advanced networking concepts while gaining practical experience. This article aims to provide comprehensive insights into the setup process, addressing common challenges and offering solutions to ensure a smooth implementation. Whether you're building a home lab, testing cloud services, or enhancing your cybersecurity knowledge, this guide will serve as a valuable resource for all your networking needs.
As we progress through the article, we'll cover everything from the foundational concepts of VPC networking to advanced configurations that maximize the potential of your Raspberry Pi. By the end, you'll have a clear understanding of how to design, implement, and manage a VPC network example tailored to your specific requirements. Let's dive in and unlock the full potential of your Raspberry Pi VPC network setup.
Read also:Stay Informed With Live Updates Your Ultimate Guide To Msnbc Breaking News Live Streaming
What is a VPC Network and Why Use Raspberry Pi for It?
A VPC (Virtual Private Cloud) network is a secure and isolated environment within the cloud, allowing users to control access, manage resources, and enhance security for their applications and services. By utilizing a Raspberry Pi to create a VPC network example, you can simulate cloud environments locally, gaining hands-on experience without the need for expensive infrastructure. This approach is particularly beneficial for learners and professionals who want to experiment with cloud services before deploying them in a live environment.
Key advantages of using Raspberry Pi for VPC networking include:
- Affordability: Raspberry Pi offers a cost-effective solution for setting up and testing VPC networks.
- Flexibility: Its customizable nature allows users to tailor the setup to their specific requirements.
- Learning Opportunities: Hands-on experience with Raspberry Pi enhances understanding of networking concepts and cloud services.
Can You Set Up a VPC Network on Raspberry Pi Without Advanced Knowledge?
While setting up a VPC network on Raspberry Pi may seem daunting, it is entirely possible for beginners to achieve this with the right guidance. This article breaks down the process into manageable steps, ensuring that even those with limited technical expertise can successfully configure their VPC network example. By following the outlined procedures and utilizing available resources, you'll be able to create a functional and secure VPC setup without requiring extensive prior knowledge.
How Does Raspberry Pi VPC Network Example Enhance Security?
Security is a critical aspect of any network setup, and a Raspberry Pi VPC network example is no exception. By implementing features such as subnets, access control lists, and security groups, you can significantly enhance the protection of your network. These components allow you to define and enforce strict access policies, ensuring that only authorized users and devices can interact with your VPC environment. Additionally, isolating your network from the public internet minimizes the risk of external threats, providing a safer space for experimentation and development.
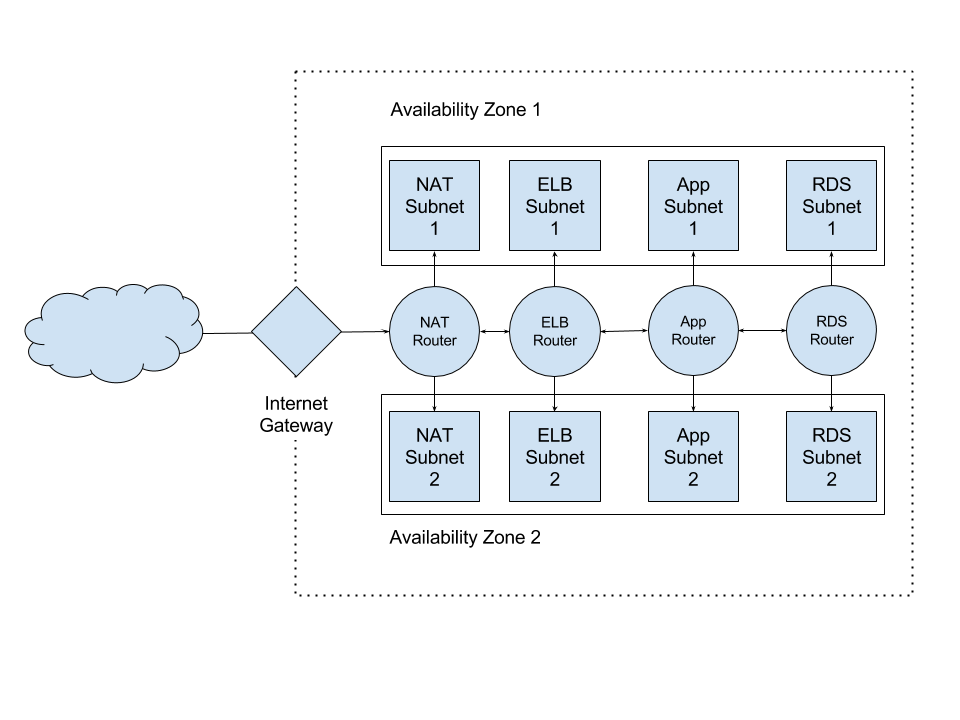
What Are the Essential Components of a Raspberry Pi VPC Network Example?
To successfully create a Raspberry Pi VPC network example, you'll need to familiarize yourself with several key components:
- VPC Subnets: Divide your network into smaller segments to improve organization and security.
- Internet Gateway: Enable communication between your VPC and the external internet when necessary.
- Route Tables: Define how traffic flows within and outside your VPC.
- Security Groups: Act as virtual firewalls to control inbound and outbound traffic to your instances.
Is Raspberry Pi Suitable for Enterprise-Level VPC Network Example?
While Raspberry Pi may not be ideal for large-scale enterprise deployments, it serves as an excellent platform for prototyping and testing VPC network examples. Its affordability and ease of use make it a perfect choice for small to medium-sized projects, educational purposes, and personal labs. By leveraging Raspberry Pi's capabilities, you can experiment with advanced networking configurations before scaling up to more robust solutions.
Read also:Ford Drive Inn A Journey Through Time And Innovation
Can You Use Raspberry Pi VPC Network Example for IoT Applications?
Absolutely! Raspberry Pi's versatility makes it an excellent choice for IoT applications, and incorporating a VPC network example can further enhance its functionality. By isolating IoT devices within a secure VPC environment, you can protect sensitive data and prevent unauthorized access. This setup is particularly useful for smart home systems, industrial automation, and other IoT-based projects where security and reliability are paramount.
Step-by-Step Guide to Setting Up Raspberry Pi VPC Network Example
Now that we've covered the basics, let's dive into the step-by-step process of setting up your Raspberry Pi VPC network example. This section will guide you through each stage of the configuration, ensuring a seamless and successful implementation.
1. Preparing Your Raspberry Pi for VPC Network Example
Before diving into the VPC setup, ensure that your Raspberry Pi is properly configured and updated. This includes installing the latest version of Raspberry Pi OS, updating all packages, and setting up SSH for remote access if needed. A well-prepared Raspberry Pi will provide a solid foundation for your VPC network example.
2. Creating Subnets and Configuring Routing
Once your Raspberry Pi is ready, the next step is to create subnets and configure routing for your VPC network example. This involves dividing your network into smaller segments and defining how traffic flows between them. Proper subnetting and routing ensure efficient communication within your VPC while maintaining security and performance.
3. Implementing Security Measures
Security is a crucial aspect of any VPC setup. Implement security groups and access control lists to control inbound and outbound traffic, protecting your network from unauthorized access. Regularly review and update these settings to adapt to changing security requirements and emerging threats.
Conclusion: Unlocking the Potential of Raspberry Pi VPC Network Example
In conclusion, setting up a Raspberry Pi VPC network example offers immense opportunities for learning and experimentation. By following the steps outlined in this article, you can create a secure and efficient VPC setup tailored to your specific needs. Whether you're a beginner exploring networking concepts or a professional enhancing your skills, this guide provides the knowledge and tools necessary to succeed. Embrace the power of Raspberry Pi and take your networking capabilities to the next level with a robust VPC network example.
Table of Contents
- What is a VPC Network and Why Use Raspberry Pi for It?
- Can You Set Up a VPC Network on Raspberry Pi Without Advanced Knowledge?
- How Does Raspberry Pi VPC Network Example Enhance Security?
- What Are the Essential Components of a Raspberry Pi VPC Network Example?
- Is Raspberry Pi Suitable for Enterprise-Level VPC Network Example?
- Can You Use Raspberry Pi VPC Network Example for IoT Applications?
- Step-by-Step Guide to Setting Up Raspberry Pi VPC Network Example
- Preparing Your Raspberry Pi for VPC Network Example
- Creating Subnets and Configuring Routing
- Implementing Security Measures
By adhering to these guidelines and leveraging the power of Raspberry Pi, you'll be well-equipped to build a VPC network example that meets your needs and exceeds your expectations. Happy networking!