Secure Shell (SSH) tunnels have become an essential tool for users seeking to enhance their privacy and security when managing remote devices, particularly the Raspberry Pi. As the popularity of Raspberry Pi continues to grow among hobbyists, developers, and professionals alike, understanding how to set up and maintain a Raspberry Pi SSH tunnel is more important than ever. This technology allows users to securely access their devices from anywhere in the world, ensuring data remains protected while enabling remote administration. Whether you're a beginner or an experienced user, this article provides a detailed exploration of Raspberry Pi SSH tunnel configurations, troubleshooting tips, and best practices to ensure your setup is both secure and efficient.
With the increasing demand for remote access solutions, Raspberry Pi SSH tunnel has emerged as a powerful method for securing communications between devices. By creating an encrypted connection, this setup ensures that sensitive information remains private, even when accessed over public networks. Moreover, it enables users to bypass geographical restrictions, making it an invaluable tool for anyone working with remote servers or IoT devices. As you delve deeper into this guide, you'll uncover the intricacies of configuring a Raspberry Pi SSH tunnel, along with practical examples and expert advice to help you achieve optimal performance.
Before we dive into the specifics of Raspberry Pi SSH tunnel configurations, it's important to understand the fundamentals of SSH and how it applies to the Raspberry Pi ecosystem. This guide will cover everything from basic setup instructions to advanced techniques, ensuring you have all the tools necessary to secure your device and maintain seamless connectivity. Whether you're looking to enhance your home network or manage a fleet of Raspberry Pi devices in a professional setting, this article provides the knowledge and resources you need to succeed.
Read also:Rays Home Games Your Ultimate Guide To Catching The Excitement
What is an SSH Tunnel and Why Use It?
SSH tunnels provide a secure method for transmitting data between two devices over an encrypted connection. This technique is particularly useful when accessing remote systems, as it ensures that sensitive information remains private and protected from unauthorized access. By leveraging the power of SSH, users can establish a secure channel that prevents eavesdropping and data tampering, making it an essential tool for anyone working with sensitive information.
In the context of Raspberry Pi, SSH tunnels offer a reliable way to manage and monitor devices remotely. This capability is especially valuable for users who need to access their Raspberry Pi from outside their local network or require additional security measures to protect their data. By understanding the principles behind SSH tunneling, you'll be better equipped to configure and maintain a secure connection that meets your specific needs.
How Does Raspberry Pi SSH Tunnel Work?
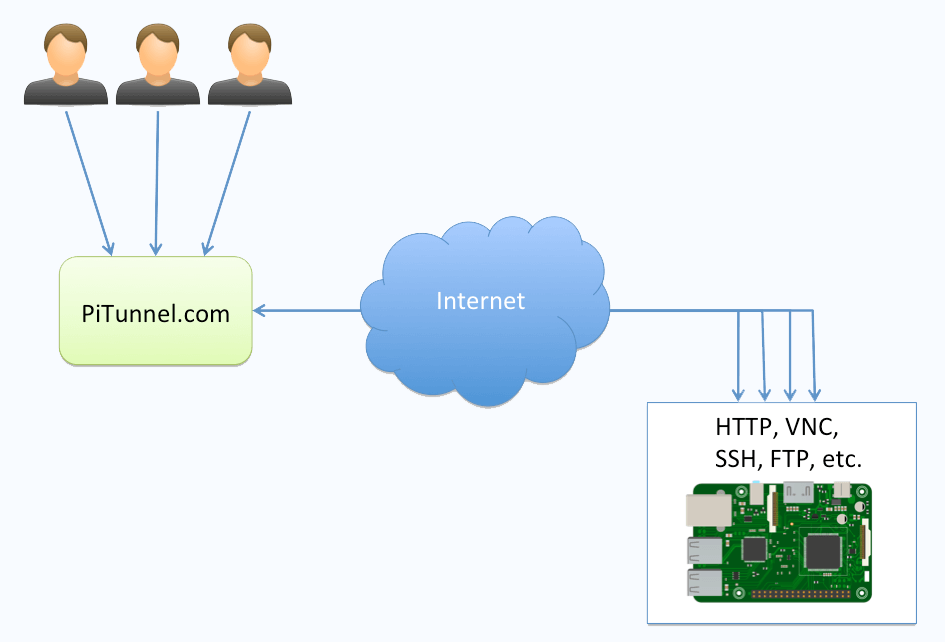
A Raspberry Pi SSH tunnel works by establishing an encrypted connection between your local machine and the Raspberry Pi device. This process involves configuring the SSH client on your computer to communicate with the SSH server running on the Raspberry Pi. Once the connection is established, all data transmitted between the two devices is encrypted, ensuring that it remains private and secure.
To set up a Raspberry Pi SSH tunnel, you'll need to ensure that SSH is enabled on your Raspberry Pi and that the necessary ports are open on your network. Additionally, you may need to configure firewall settings to allow SSH traffic, depending on your specific setup. By following the steps outlined in this guide, you'll be able to create a secure and reliable connection that enables remote access to your Raspberry Pi device.
Why Should You Use Raspberry Pi SSH Tunnel?
Using a Raspberry Pi SSH tunnel offers numerous benefits, including enhanced security, improved privacy, and greater flexibility in managing remote devices. By encrypting all data transmitted between your local machine and the Raspberry Pi, you can ensure that sensitive information remains protected from prying eyes. Additionally, SSH tunnels allow you to bypass geographical restrictions, enabling you to access your Raspberry Pi from anywhere in the world.
Beyond these advantages, Raspberry Pi SSH tunnel configurations can also improve the overall performance of your network by reducing latency and optimizing data transmission. This makes it an ideal solution for users who need to manage multiple devices or require consistent access to their Raspberry Pi for extended periods.
Read also:Experience The Magic Discovering The Vibrant World Of Sunset Station Theater Henderson
Can Raspberry Pi SSH Tunnel Be Used for Other Purposes?
Absolutely! While Raspberry Pi SSH tunnel is primarily used for secure remote access, it can also be employed for a variety of other purposes, such as setting up a virtual private network (VPN), accessing blocked websites, or even securing internet traffic on public Wi-Fi networks. By leveraging the versatility of SSH tunneling, you can tailor your setup to meet a wide range of needs and applications.
For example, you might use a Raspberry Pi SSH tunnel to create a secure connection for accessing cloud storage services, ensuring that your data remains private and protected at all times. Alternatively, you could configure the tunnel to serve as a proxy server, enabling you to browse the web anonymously and avoid censorship or geo-restrictions.
What Are the Key Benefits of Raspberry Pi SSH Tunnel?
- Enhanced security through encrypted connections
- Improved privacy by masking your IP address
- Flexibility in managing remote devices
- Bypassing geographical restrictions
- Reduced latency and optimized data transmission
Is Raspberry Pi SSH Tunnel Difficult to Set Up?
Setting up a Raspberry Pi SSH tunnel is relatively straightforward, especially for users familiar with basic Linux commands and network configurations. However, if you're new to the process, it may take some time to become comfortable with the various settings and options available. Fortunately, this guide provides step-by-step instructions and practical examples to help you navigate the setup process with ease.
Step-by-Step Guide to Configuring Raspberry Pi SSH Tunnel
Configuring a Raspberry Pi SSH tunnel involves several key steps, including enabling SSH on your Raspberry Pi, setting up port forwarding, and configuring your SSH client. Below, we'll walk you through each stage of the process, ensuring you have all the information you need to establish a secure and reliable connection.
How to Enable SSH on Raspberry Pi?
- Access your Raspberry Pi's terminal either directly or via a local network connection.
- Run the command
sudo raspi-configto open the configuration menu. - Navigate to the "Interfacing Options" section and select "SSH".
- Choose "Enable" to activate the SSH server on your Raspberry Pi.
Once SSH is enabled, you can proceed to the next step of configuring your SSH client and establishing a secure connection.
What Are the Best Practices for Raspberry Pi SSH Tunnel?
To ensure optimal performance and security when using a Raspberry Pi SSH tunnel, consider the following best practices:
- Use strong, unique passwords or key-based authentication for added security.
- Regularly update your Raspberry Pi's operating system and SSH software to protect against vulnerabilities.
- Monitor your network traffic to detect any suspicious activity or unauthorized access attempts.
- Limit SSH access to trusted IP addresses whenever possible to minimize the risk of unauthorized access.
Conclusion: Unlocking the Potential of Raspberry Pi SSH Tunnel
By mastering the art of Raspberry Pi SSH tunnel configurations, you can unlock a world of possibilities for managing and securing your devices. Whether you're a beginner looking to explore the basics of SSH tunneling or an experienced user seeking advanced techniques, this guide provides the tools and resources you need to succeed. With a focus on security, flexibility, and performance, Raspberry Pi SSH tunnel offers an unparalleled solution for anyone working with remote devices or seeking to enhance their network's capabilities.
Table of Contents
- What is an SSH Tunnel and Why Use It?
- How Does Raspberry Pi SSH Tunnel Work?
- Why Should You Use Raspberry Pi SSH Tunnel?
- Can Raspberry Pi SSH Tunnel Be Used for Other Purposes?
- What Are the Key Benefits of Raspberry Pi SSH Tunnel?
- Is Raspberry Pi SSH Tunnel Difficult to Set Up?
- Step-by-Step Guide to Configuring Raspberry Pi SSH Tunnel
- How to Enable SSH on Raspberry Pi?
- What Are the Best Practices for Raspberry Pi SSH Tunnel?
- Conclusion: Unlocking the Potential of Raspberry Pi SSH Tunnel